Development Environment Setup
- Make sure you have
nvm, nodev7.6.0 and upinstalled - Install
yarn-npm install -g yarn. - Use a smart
.npmrc. By default,npmdoesn’t save installed dependencies to package.json (and you should always track your dependencies!). npm install -g standard# standardjsnpm install -g babel-eslintnpm install -g snazzy# Format JavaScript Standard Style as beautiful output
$ npm config set save=true
$ npm config set save-exact=true
$ cat ~/.npmrc
When adding new packages, always use yarn add --exact <package>. To add a package as a devDependency, use yarn add --exact -D <package>. This will ensure the package is always added to the yarn.lock file.
Quick start
Make sure you have nvm, node v7.6.0, and yarn installed before proceeding with the following steps. Also, ensure :
- Clone repo -
git clone git@bitbucket.org:anteraaron/e-commerce-front-end.git - Run
yarnto install dependencies and clean the git repo. - Run
yarn startto see the app athttp://localhost:3000.
To build and test production build:
- Run
yarn run buildto build the app. - Run
yarn run start:prodto run the app in production mode. Make sure there are no errors in the browser console log.
The application uses Semantic-UI and semantic-ui-react as the UI library. To customize theme and css styles of the application:
- Run
npm install -g gulp - Go to
/semanticfolder - Modify the application theme in
/semantic/src/themes/7-eleven - Build the theme -
gulp build. This will generate an updated/semantic/dist/semantic.min.css, which is the main css file loaded in the application.
Documentation
- Commands: Getting the most out of this boilerplate
- Code Style Guide: Code style guide for JavaScript, React, and CSS
- Contributing Code: How to contribute code using GitHub Flow
- Testing: How to work with the built-in test harness
- CSS: How to work with the CSS tooling
- Your app: Supercharging your app with Routing, Redux, simple asynchronicity helpers, etc.
- Semantic UI: The UI library used and how to customize the theming and styles of the library for the app.
Overview
Application Folder Structure
The [app/](../../../tree/master/app) directory contains your entire application code, including CSS, JavaScript, HTML and tests.
The rest of the folders and files only exist to make your life easier, and should not need to be touched.
Some files left out for brevity.
.
├── app/
|   ├── components
|   |   └── Button
|   |       ├── index.js
|   |       └── tests
|   |           └── index.test.js
|   ├── containers
|   |   ├── App
|   |   |   ├── tests
|   |   |   |   ├── actions.js
|   |   |   |   ├── index.test.js
|   |   |   |   └── reducer.test.js
|   |   |   ├── actions.js
|   |   |   ├── constants.js
|   |   |   ├── index.js
|   |   |   ├── sagas.js
|   |   |   └── reducer.js
|   |   |
|   ├── tests
|   ├── utils
|   └── index.js
├── build/
├── docs/
├── internals/
├── semantic/
├── server/
├── .editorconfig
├── .gitattributes
└── .gitignore
└── package.json
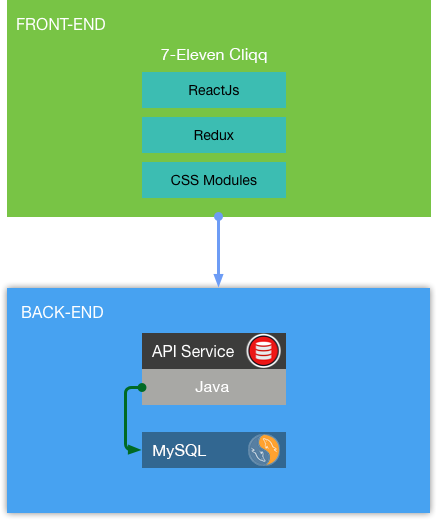
Architecture Diagram

Building & Deploying
-
Run
npm run build, which will compile all the necessary files to thebuildfolder. -
Upload the contents of the
buildfolder to your web server's root folder.
CSS
This boilerplate uses styled-components allowing you to write your CSS in your JavaScript, removing the mapping between styles and components.
styled-components let's us embrace component encapsulation while sanitize.css gives us data-driven cross-browser normalization.
See the CSS documentation for more information about PostCSS and CSS modules.
JS
The app bundles all your clients-side scripts and chunk them into several files using code splitting where possible. Your code is automatically optimized when building for production so you don't have to worry about that.
See the JS documentation for more information about the JavaScript side of things.
SEO
App uses react-helmet for managing document head tags. Examples on how to write head tags can be found here.
Testing
For a thorough explanation of the testing procedure, see the testing documentation!
Performance testing
With the production server running (i.e. while npm run start:production is running in
another tab), enter npm run pagespeed to run Google PageSpeed Insights and
get a performance check right in your terminal!
Browser testing
npm run start:tunnel makes your locally-running app globally available on the web
via a temporary URL: great for testing on different devices, client demos, etc!
Unit testing
Unit tests live in test/ directories right next to the components being tested
and are run with npm run test.